WHAT ARE WINDING STICKS?
Winding sticks are traditional tools used for aiding in flattening boards for furniture making. They help a woodworker know when there is “wind” or twisting in their board. With the introduction of power tools, the use of winding sticks has dwindled because the power jointer & thickness planer will remove the twist automatically. But a lot of people are becoming more interested in the old ways of working wood. I’ve squared a lot of boards up by hand, and I love hand tools. But nowadays I usually do most of my lumber dimensioning with power tools and leave much of the joinery and finishing to hand tools. However, I’m currently building some Moravian workbenches and large Roubo workbenches for my school (see my new school web page here), and I don’t have a power jointer or thickness planer large enough to remove the twist from my several hundred pound workbench tops. So I’ve had to square the twisted workbench tops up with hand tools (and my friend’s power hand planer for a badly twisted workbench slab), and winding sticks were indispensable for identifying the high corners.
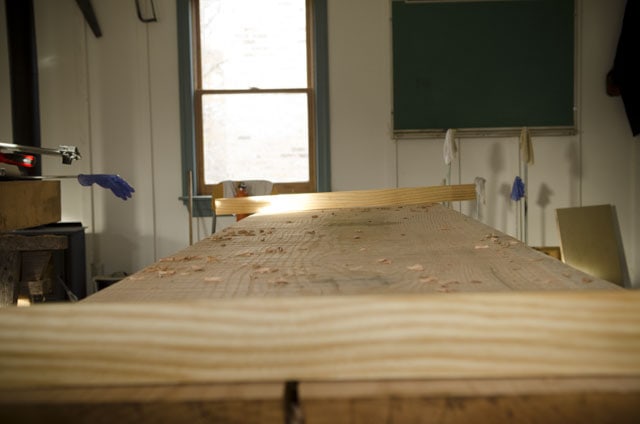
HOW DO YOU USE WINDING STICKS?
One winding stick is placed on each end of the board, and the woodworker crouches down and sites along the board, using the winding stick to see which corner is higher than the other. The winding sticks exaggerate the twist. The longer the winding sticks, the more exaggerated the twist will be. If both winding sticks are level with each other, there is no “wind” or twisting in the board. But if one corner is higher, then that corner needs to be lowered with a jack plane or scrub plane. And the opposite corner will usually also need to be planed down because of the way a board twists. A contrasting inlay or mark of some sort is put on one of the winding sticks to make it easier to see the difference between the sticks. If you want to learn how to square up boards with hand tools, you can check out the in-depth tutorial that I wrote & filmed several years ago here.
HOW TO MAKE WINDING STICKS
The above video at the top of this article shows how I make winding sticks. But winding sticks don’t need to be fancy. The minimum principles that you really need to know about making winding sticks is to properly square up some stable wood, make the winding sticks as long as is convenient, make sure they have a base and won’t tip over, and make sure there is some sort of mark or inlay on the ends of one winding stick (or both if you’re ambitious).
Winding sticks can be as simple as two pieces of aluminum angle iron from your hardware store (like this) or two pieces of straight wood with magic marker drawn on it. But most people make them a bit more fancy so they won’t be mistaken for scrap wood or firewood. But that is indeed how mine start out. I use scrap wood to make winding sticks. But quartersawn or rift sawn wood, or plywood are more stable and will stay straighter for longer. So if you have some leftover quartersawn wood, then use that. Just don’t spend a lot of money, and for Pete’s sake, don’t buy commercially made winding sticks. I’d rather see you using aluminum angle iron or plywood.
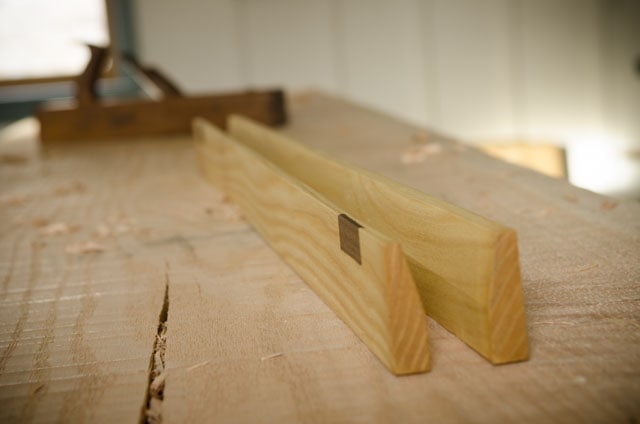
I made this new set of winding sticks to accommodate the wide workbench slabs that I was flattening, so they were about three feet long. The other dimensions don’t really matter that much, except that the base should ideally be at least 1/2-inch wide to keep the winding sticks from tipping over. My final dimensions were 5/8-inch thick at the base x 2 1/4-inches tall x 36-inches long. There’s no need to copy my dimensions, because I just used wood that I had. I added a bevel with a jack plane & jointer plane, and also added a walnut inlay. Just make sure that your inlay, or dowel, or marker is a contrasting color from your winding sticks so it will stick out. And you can add a finish if you’re really O.C.D. That’s it!

I’d have to say that what you are watching here about winding sticks is true, I had to use them for building my very large bench top that was 42”x11’
How ever I used two crick masonry levels because they are true and very straight, I used these because that is what I used in the trade of laying brick and stone for 30 yrs.
Thanks for your comment Larry. As I mentioned, you can use a lot of things as winding sticks, as long as they are straight.